Creating Campaigns
Create targeted SMS marketing campaigns with TextFlow’s intuitive 4-step campaign builder. This guide walks you through each step of the campaign creation process.
Before You Start
Section titled “Before You Start”Prerequisites:
- ✅ At least one contact list or tag with contacts
- ✅ At least one phone number configured in your account
- ✅ Sufficient message credits in your plan
What You’ll Need:
- Campaign name and description
- Target audience (lists or tags)
- Message content
- Sending schedule (immediate or scheduled)
Campaign Creation Overview
Section titled “Campaign Creation Overview”TextFlow’s campaign builder consists of 4 steps:
- Basics - Campaign name, type, and phone number
- Audience - Select target lists or tags
- Message & Compliance - Compose message and configure CASL settings
- Review - Final review before sending
Each step validates your inputs before allowing you to proceed.
Step 1: Campaign Basics
Section titled “Step 1: Campaign Basics”
Accessing the Campaign Builder
Section titled “Accessing the Campaign Builder”- Click Campaigns in the left navigation
- Click New Campaign button
You’ll see the campaign builder with 4 progress steps at the top.
Campaign Basics Fields
Section titled “Campaign Basics Fields”Campaign Name (Required)
- Internal identifier for your campaign
- Examples: “Spring Sale 2024”, “VIP Customer Update”, “New Product Launch”
- Best Practice: Use descriptive names that indicate purpose and date
Description (Optional)
- Internal notes about the campaign purpose
- Examples: “Announcing spring collection with 25% discount for VIP customers”
- Not visible to recipients
Campaign Type (Required)
Choose when to send your campaign:
| Type | Description | Use When |
|---|---|---|
| Send Immediately | Sends as soon as campaign is created | Time-sensitive announcements, immediate follow-ups |
| Schedule for Later | Choose specific date and time | Planning ahead, optimal timing, multi-timezone coordination |
From Phone Number (Required)
- Select which phone number will appear as the sender
- Recipients will see this number
- Choose a number that matches your campaign purpose:
- Dedicated numbers: For department-specific campaigns
- Pool numbers: For general marketing campaigns
Scheduled Campaigns
Section titled “Scheduled Campaigns”If you select “Schedule for Later”, additional fields appear:
Send Date
- Calendar picker for selecting the date
- Cannot schedule in the past
Send Time
- Time picker (24-hour format)
- Timezone: EST (your organization’s timezone)
Quiet Hours Handling
- If scheduled during quiet hours (9pm-9am), messages will queue until 9am
- Applies per-recipient timezone
Proceeding to Step 2
Section titled “Proceeding to Step 2”Click Next to proceed to Audience Selection.
Validation:
- Campaign name must not be empty
- Phone number must be selected
Step 2: Target Audience
Section titled “Step 2: Target Audience”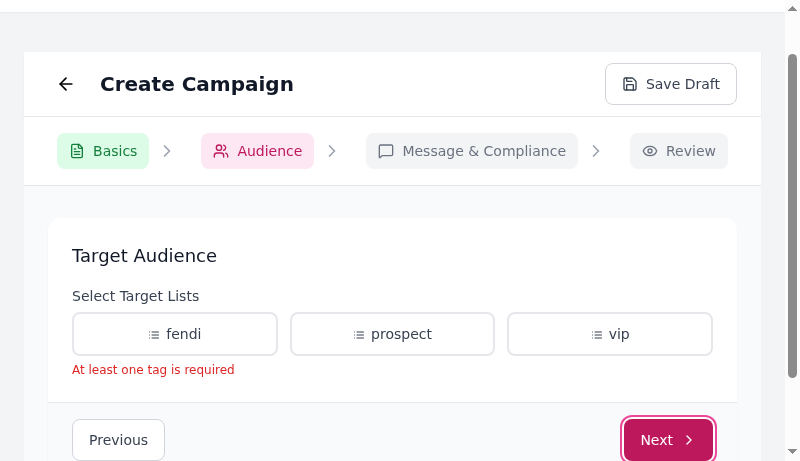
Selecting Target Lists
Section titled “Selecting Target Lists”Choose which contact lists will receive your campaign.
List Selection:
- Click on list buttons to select/deselect
- Selected lists show with colored background
- Multiple lists can be selected
Contact Count Summary:
Once you select lists, you’ll see:
| Metric | Description |
|---|---|
| Selected Lists | Number of lists selected |
| Total Contacts | All contacts in selected lists (including duplicates) |
| Opted Out | Contacts who have unsubscribed (will not receive messages) |
| Will Receive | Final recipient count after removing opt-outs and duplicates |
Tag-Based Targeting
Section titled “Tag-Based Targeting”If you’re using Tags View:
Single Tag:
- Select one tag to target all contacts with that tag
Multiple Tags (AND/OR logic):
- All of these (AND): Contacts must have ALL selected tags
- Any of these (OR): Contacts must have AT LEAST ONE selected tag
Example:
- Tags: “toronto” AND “vip” → Only VIP customers in Toronto
- Tags: “toronto” OR “vancouver” → Customers in either city
Audience Best Practices
Section titled “Audience Best Practices”- ✅ Start small: Test with a small list before sending to thousands
- ✅ Segment carefully: More targeted = higher engagement
- ✅ Review opt-outs: Check the “Opted Out” count before sending
- ✅ Avoid over-messaging: Don’t send to the same list more than 2-3 times per week
Proceeding to Step 3
Section titled “Proceeding to Step 3”Click Next to proceed to Message & Compliance.
Validation:
- At least one list or tag must be selected
- “Will Receive” count must be greater than 0
Step 3: Message & Compliance
Section titled “Step 3: Message & Compliance”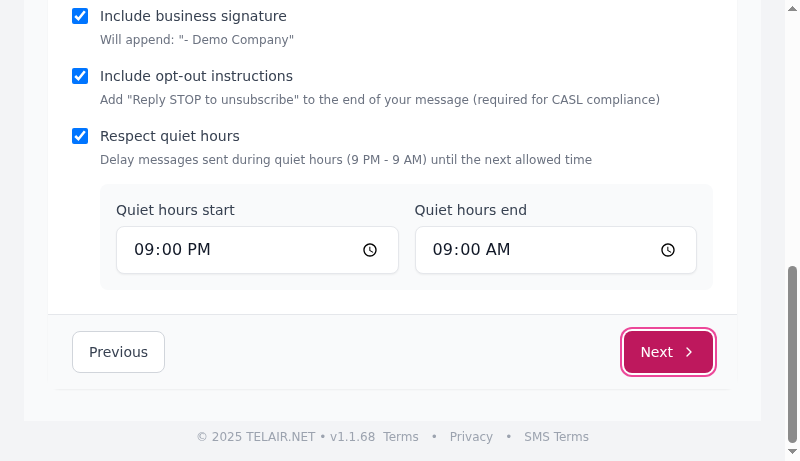
Message Content
Section titled “Message Content”Message Text Field:
- Type or paste your SMS message
- Maximum: 1600 characters
- Real-time character count displayed
Character Counter:
122/1600 (1 segment)- Characters: Current character count
- Segments: Number of SMS segments
- Standard SMS: 160 characters per segment
- Unicode (emojis): 70 characters per segment
- Cost: Each segment counts as one message
Personalization Tokens
Section titled “Personalization Tokens”Insert dynamic contact fields into your message:
| Button | Token | Replaced With |
|---|---|---|
| +First Name | {{firstName}} | Contact’s first name |
| +Last Name | {{lastName}} | Contact’s last name |
{{email}} | Contact’s email address |
Example:
Hi {{firstName}}, our spring collection is here!Get 25% off all new arrivals this week only.Renders as:
Hi Sarah, our spring collection is here!Get 25% off all new arrivals this week only.AI Assistant
Section titled “AI Assistant”Use the AI Assistant panel to generate or improve your message:
Generate Messages:
- Enter your message topic (e.g., “Holiday sale 20% off”)
- Select a tone (Professional, Friendly, Urgent, etc.)
- Click Generate Options
- Review generated variations
- Click Use This to apply a message
Analyze Messages:
- Write your message in the text field
- Click Analyze for Compliance & Quality
- Review compliance checks and suggestions
- Apply suggested rewrites if desired
See AI Assistant for detailed usage guide.
Message Templates
Section titled “Message Templates”Click Use Template to load pre-saved message templates:
- Choose from your saved templates
- Template content loads into the message field
- Edit as needed
- Tokens are preserved
Message Preview
Section titled “Message Preview”As you type, a real-time preview shows:
- Your message content
- Personalization tokens (as-is, not rendered)
- Business signature (if enabled)
- Opt-out instructions (if enabled)
Example Preview:
Hi {{firstName}}, our spring collection is here!Get 25% off all new arrivals this week only.Shop now: example.com/spring
- Demo Company
Reply STOP to unsubscribe.
Compliance Settings
Section titled “Compliance Settings”TextFlow includes mandatory CASL (Canada’s Anti-Spam Legislation) compliance features:
Include Business Signature
Section titled “Include Business Signature”☑️ Enabled by default
Automatically appends your organization name:
- Demo CompanyWhen to disable:
- Two-way conversational messages (not marketing)
- Follow-up messages in an existing thread
Include Opt-Out Instructions
Section titled “Include Opt-Out Instructions”☑️ Enabled by default (Required for CASL compliance)
Automatically appends:
Reply STOP to unsubscribe.Important:
- Required for all marketing messages in Canada
- Cannot be disabled for campaign messages
- Opt-outs are processed automatically
Respect Quiet Hours
Section titled “Respect Quiet Hours”☑️ Enabled by default
What it does:
- Delays messages sent during quiet hours
- Messages queue and send when quiet hours end
- Applied per-recipient timezone (based on area code)
Default Quiet Hours:
- Start: 9:00 PM
- End: 9:00 AM
Customizing Quiet Hours:
- Use the time pickers to adjust start/end times
- Time is in 12-hour format (AM/PM)
- Applied to all recipients based on their timezone
How Timezones Work:
- Toronto (416/647): Eastern Time
- Vancouver (604/778): Pacific Time
- Messages sent at appropriate local time for each recipient
Example:
- Campaign scheduled for 8:00 PM EST
- Toronto recipients: Queued until 9:00 AM EST next day
- Vancouver recipients: Sent at 5:00 PM PST (same moment, different timezone)
Message Best Practices
Section titled “Message Best Practices”- ✅ Clear call-to-action: What do you want recipients to do?
- ✅ Include links: Short, trackable URLs (use a URL shortener)
- ✅ Create urgency: “This week only”, “Limited time”, “Today only”
- ✅ Personalize: Use first names for higher engagement
- ✅ Test first: Send to yourself to check rendering
Good Example:
Hi {{firstName}}! Flash sale: 40% off all jacketstoday only. Shop now: bit.ly/sale40Bad Example:
Hello valued customer, we are pleased to announcethat our organization is having a promotional eventwhere you can save money on select merchandise...Proceeding to Step 4
Section titled “Proceeding to Step 4”Click Next to proceed to Review.
Validation:
- Message text must not be empty
- Character count must be ≤ 1600
Step 4: Review & Send
Section titled “Step 4: Review & Send”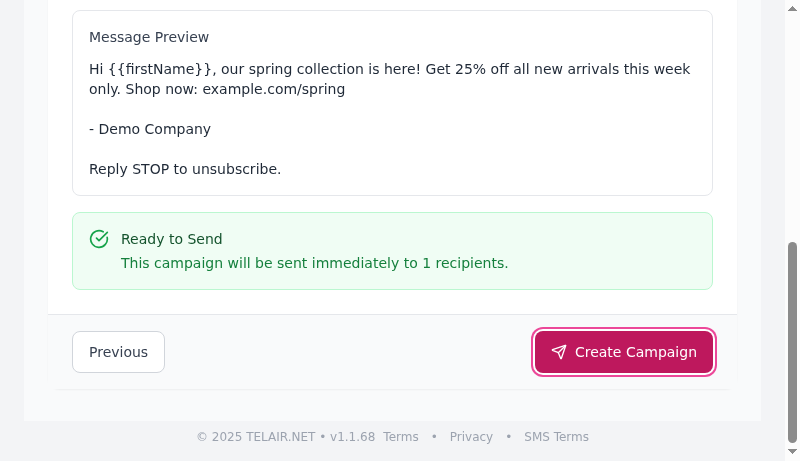
Campaign Summary
Section titled “Campaign Summary”Review all campaign details before sending:
Campaign Details:
- Name: Your campaign name
- Delivery: “Immediate” or scheduled date/time
- Target Audience: Number of lists/tags selected
- Planned Messages: Final recipient count
Message Preview:
- Shows complete message with all compliance additions
- Personalization tokens shown as
{{firstName}}(not rendered) - Includes business signature and opt-out instructions
Ready to Send:
- Confirms final recipient count
- Warning if count is very high
Final Checks
Section titled “Final Checks”Before clicking Create Campaign, verify:
- Campaign name is correct and descriptive
- Target audience is correct (not too broad/narrow)
- Message has no typos or errors
- Links are correct and working
- Personalization tokens are formatted correctly
- Quiet hours settings are appropriate
- You have sufficient message credits
Creating the Campaign
Section titled “Creating the Campaign”Option 1: Create Campaign
- Click Create Campaign button
- Campaign is created and:
- Immediate: Starts sending within seconds
- Scheduled: Queued for future delivery
Option 2: Save as Draft
- Click Save Draft (available on any step)
- Campaign saved but not sent
- Access from Campaigns page to edit and send later
Option 3: Go Back
- Click Previous to return to any step
- Make changes as needed
- Navigate forward again
After Campaign Creation
Section titled “After Campaign Creation”Once you click Create Campaign:
Immediate Campaigns:
- Redirected to Campaigns page
- Campaign status: Active
- Messages begin sending immediately
- Real-time progress updates on campaign card
Scheduled Campaigns:
- Redirected to Campaigns page
- Campaign status: Scheduled
- Shows scheduled date/time
- Can cancel or edit before send time
Managing Campaign Drafts
Section titled “Managing Campaign Drafts”Saving a Draft
Section titled “Saving a Draft”At any step during campaign creation:
- Click Save Draft button (top-right)
- Draft is saved with current progress
- Redirected to Campaigns page
Editing a Draft
Section titled “Editing a Draft”- Go to Campaigns page
- Find your draft (status: Draft)
- Click Edit campaign
- Continue from where you left off
- Click Send when ready
Deleting a Draft
Section titled “Deleting a Draft”- Find the draft campaign
- Click Delete campaign (in dropdown menu)
- Confirm deletion
Campaign Scheduling
Section titled “Campaign Scheduling”Scheduling Best Practices
Section titled “Scheduling Best Practices”Optimal Send Times:
- Tuesday-Thursday: 10am-2pm (highest engagement)
- Avoid:
- Monday before 10am (email backlog)
- Friday after 3pm (weekend mindset)
- Weekends (unless urgent)
Multi-Timezone Campaigns:
- TextFlow automatically adjusts for recipient timezones
- Schedule for optimal time in YOUR timezone
- Recipients receive at equivalent local time
Example:
- Schedule: Tuesday 11:00 AM EST
- Toronto (EST): Receives at 11:00 AM
- Vancouver (PST): Receives at 8:00 AM (same moment)
Canceling a Scheduled Campaign
Section titled “Canceling a Scheduled Campaign”Before the scheduled send time:
- Go to Campaigns page
- Find scheduled campaign
- Click Cancel campaign
- Confirm cancellation
Note: Cannot cancel campaigns after sending starts.
Testing Campaigns
Section titled “Testing Campaigns”Test Before Sending
Section titled “Test Before Sending”Always test campaigns before sending to your full list:
Method 1: Test List
- Create a “Test” list with your phone number(s)
- Create campaign targeting only the test list
- Review message on your device
- Check links, formatting, personalization
Method 2: Small Sample
- Create campaign with limited audience (e.g., 10 contacts)
- Send and monitor results
- If successful, duplicate and expand audience
What to Test
Section titled “What to Test”- Message appears correctly on iPhone and Android
- Links work and direct to correct pages
- Personalization renders properly
- Business signature appears
- Opt-out instructions appear
- No typos or formatting issues
Campaign Limits
Section titled “Campaign Limits”Message Limits
Section titled “Message Limits”Campaigns respect your plan’s message limits:
| Plan | Daily Limit | Monthly Limit |
|---|---|---|
| Starter | 5,000 | 50,000 |
| Marketer | 25,000 | 250,000 |
| Custom | Varies | Varies |
What Happens at Limit:
- Campaign automatically pauses
- Remaining messages queue
- Resume sending when limit resets (midnight EST for daily, 1st of month for monthly)
Purchase Additional Messages
Section titled “Purchase Additional Messages”If you exceed your limit:
- Dashboard shows “Purchase Message Packs”
- Click to buy one-time message packs
- Campaign resumes automatically
Troubleshooting
Section titled “Troubleshooting””No contacts will receive this message”
Section titled “”No contacts will receive this message””Problem: Selected lists have no valid recipients
Solutions:
- Check if contacts exist in selected lists
- Verify contacts haven’t all opted out
- Ensure phone numbers are valid (+1 format)
“Message too long”
Section titled ““Message too long””Problem: Message exceeds 1600 characters
Solutions:
- Shorten message content
- Remove unnecessary words
- Use URL shortener for links
- Split into two campaigns if necessary
Campaign stuck in “Sending”
Section titled “Campaign stuck in “Sending””Problem: Campaign not completing
Check:
- Daily/monthly message limits (Dashboard)
- Quiet hours settings (may be delayed)
- Campaign analytics for error details
Solution:
- Wait for quiet hours to end
- Purchase additional messages if at limit
- Contact support if issue persists
Personalization not working
Section titled “Personalization not working”Problem: {{firstName}} appears in message instead of name
Solutions:
- Verify contact has first name field populated
- Check token spelling:
{{firstName}}not{{firstname}} - Test with contacts that have all fields filled
Next Steps
Section titled “Next Steps”After creating your campaign:
- AI Assistant - Generate and analyze messages with AI
- Message Templates - Save messages for future campaigns
- Scheduling - Schedule campaigns for optimal timing
- Auto-Responders - Set up automated keyword replies
Ready to launch your first campaign? Create targeted, CASL-compliant SMS campaigns in minutes with TextFlow’s intuitive builder.