Importing Contacts
Import your existing contact lists into TextFlow using CSV, XLS, XLSX, or TXT files. This guide walks you through the import process step-by-step.
Before You Import
Section titled “Before You Import”Prepare Your Data
Section titled “Prepare Your Data”Required Fields:
- Phone Number: 10-11 digits (e.g., 4165551234 or 14165551234)
- First Name: Contact’s first name
Optional Fields:
- Last Name
- Email Address
- Business/Company Name
- Tags (comma-separated)
- Contact Type
CSV Format
Section titled “CSV Format”TextFlow accepts CSV files without headers. Each row should contain contact information in this order:
phone,firstName,lastName,email,business,tagsExample CSV:
4165551234,Jane,Smith,jane@example.com,ABC Company,vip6475551234,Bob,Johnson,bob@example.com,XYZ Corp,prospect4165555678,Alice,Williams,,Tech Solutions,customerPhone Number Format
Section titled “Phone Number Format”Accepted Formats:
- ✅
4165551234(10 digits) - ✅
14165551234(11 digits with country code) - ✅
6475551234(10 digits, different area code)
Not Accepted:
- ❌
(416) 555-1234(formatting characters) - ❌
416-555-1234(hyphens) - ❌
+1 416 555 1234(spaces and plus sign)
TextFlow will automatically:
- Add +1 country code if missing
- Format for display as +1 (416) 555-1234
- Validate phone number length
Importing Contacts
Section titled “Importing Contacts”Step 1: Access Import Function
Section titled “Step 1: Access Import Function”There are two ways to import contacts:
Method 1: From Contact List
- Click Contacts in the navigation
- Select a list from the sidebar
- Click the Import button next to the list name
Method 2: From Contacts Page
- Click Contacts in the navigation
- Select a list
- Click the Import button at the top of the contacts table
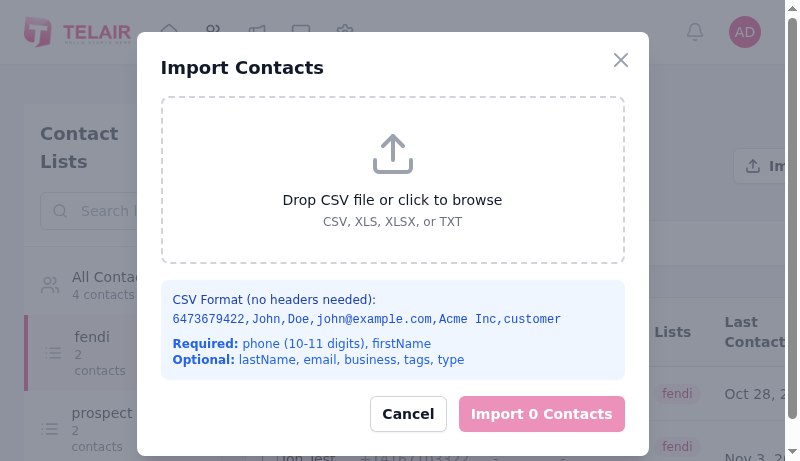
Step 2: Upload File
Section titled “Step 2: Upload File”Upload Your CSV:
- Click “Choose Files” or drag and drop your CSV file onto the upload area
- Supported formats: CSV, XLS, XLSX, TXT
- Maximum file size: 10 MB
- File name will appear once uploaded
What Happens:
- TextFlow reads your file
- Parses contact data
- Validates phone numbers
- Counts total valid contacts
Step 3: Review Import Preview
Section titled “Step 3: Review Import Preview”After uploading, TextFlow shows:
Import Summary:
- Total Contacts: Number of rows in your file
- Valid Contacts: Contacts with valid phone numbers and first names
- Invalid Contacts: Rows that will be skipped (missing required fields)
Preview Table:
- Shows first 5-10 contacts
- Displays how data will be imported
- Highlights any validation issues
Step 4: Confirm Import
Section titled “Step 4: Confirm Import”- Review the contact count: “Import X Contacts”
- Click Import X Contacts button
- Import process begins
During Import:
- Progress indicator shows number of contacts processed
- Duplicates are automatically detected
- Invalid phone numbers are skipped
Step 5: Import Complete
Section titled “Step 5: Import Complete”After import completes:
Success Message:
- “Successfully imported X contacts”
- Shows number of contacts added
- Lists number of duplicates skipped
Contacts Appear:
- In the selected list
- Immediately available for campaigns
- Searchable and filterable
Handling Duplicates
Section titled “Handling Duplicates”How TextFlow Detects Duplicates
Section titled “How TextFlow Detects Duplicates”Duplicates are identified by phone number only:
- If phone number exists: Contact is skipped
- Name/email differences don’t matter
- Applies across ALL lists (global deduplication)
Example:
Existing: 4165551234, Jane Smith, jane@example.comImport: 4165551234, Jane Doe, janedoe@example.comResult: SKIPPED (phone number already exists)Duplicate Handling Options
Section titled “Duplicate Handling Options”During Import:
-
Skip Duplicates (Default)
- Existing contacts remain unchanged
- Duplicate rows are not imported
- Import summary shows “X duplicates skipped”
-
Update Existing (If available)
- Updates existing contact with new information
- Keeps existing phone number
- Merges into additional lists if specified
Data Validation
Section titled “Data Validation”Phone Number Validation
Section titled “Phone Number Validation”TextFlow validates every phone number:
Valid:
- ✅ Exactly 10 or 11 digits
- ✅ North American numbers (USA/Canada)
- ✅ Area codes: 416, 647, 905, 437, etc.
Invalid (Skipped):
- ❌ Less than 10 digits
- ❌ More than 11 digits
- ❌ Contains letters or special characters
- ❌ International numbers outside North America
Auto-Corrections:
- Removes spaces, hyphens, parentheses
- Adds +1 country code if missing
- Standardizes to E.164 format
Name Validation
Section titled “Name Validation”First Name:
- Required field
- Must not be empty
- Maximum 50 characters
Last Name:
- Optional
- Maximum 50 characters
- Can be blank
Email Validation
Section titled “Email Validation”Format Check:
- Must contain @ symbol
- Must have domain (e.g., example.com)
- Invalid emails are skipped (contact still imported if phone/name valid)
Examples:
- ✅
jane@example.com - ✅
bob.smith@company.co.uk - ❌
invalid-email(skipped) - ❌
missing@domain(skipped)
Import Limits
Section titled “Import Limits”File Size Limits
Section titled “File Size Limits”| Limit Type | Maximum |
|---|---|
| File Size | 10 MB |
| Contacts per Import | 50,000 rows |
| Columns | 10 columns |
Import Frequency
Section titled “Import Frequency”Rate Limits:
- 5 imports per hour per user
- 10 imports per day per organization
Why Limits Exist:
- Prevents accidental duplicate imports
- Protects system performance
- Ensures data quality
Common Import Errors
Section titled “Common Import Errors””No valid contacts found”
Section titled “”No valid contacts found””Problem: CSV has no contacts with required fields
Solutions:
- Verify first column is phone number
- Ensure second column is first name
- Check that phone numbers are 10-11 digits
- Remove any completely blank rows
”Phone number already exists”
Section titled “”Phone number already exists””Problem: All contacts in CSV already exist in TextFlow
Solution:
- Export existing contacts to compare
- Check if this is an accidental re-import
- If updating info, edit contacts manually or delete and re-import
”Invalid phone number format”
Section titled “”Invalid phone number format””Problem: Phone numbers contain formatting or are wrong length
Solutions:
- Remove parentheses, hyphens, spaces from phone numbers in CSV
- Ensure exactly 10 or 11 digits per number
- Use Excel’s Find & Replace feature to remove formatting characters
”File too large”
Section titled “”File too large””Problem: CSV exceeds 10 MB limit
Solutions:
- Split into multiple smaller files
- Remove unnecessary columns
- Delete test/dummy data
- Compress file (ZIP not supported - must upload uncompressed CSV)
“Import failed - try again”
Section titled ““Import failed - try again””Problem: Temporary server issue
Solutions:
- Wait 1-2 minutes and retry
- Check internet connection
- Try a smaller batch (500-1000 contacts)
- Contact support if persists
Best Practices
Section titled “Best Practices”Before Importing
Section titled “Before Importing”-
✅ Clean Your Data
- Remove duplicate phone numbers in Excel
- Delete test/dummy contacts
- Verify phone number format (10-11 digits, numbers only)
- Check for typos in names
-
✅ Export First
- Export existing TextFlow contacts
- Compare with import file
- Identify true duplicates vs. new contacts
-
✅ Test with Small Batch
- Import 5-10 contacts first
- Verify data appears correctly
- Check formatting and field mapping
- Then import full list
-
✅ Backup Your CSV
- Save original CSV file
- Keep a copy before making changes
- Easier to fix errors and re-import
After Importing
Section titled “After Importing”-
✅ Verify Contact Count
- Check list shows expected number of contacts
- Account for duplicates skipped
- Review import summary message
-
✅ Spot Check Data
- Open 5-10 random contacts
- Verify names, emails, tags are correct
- Look for any formatting issues
-
✅ Check for Opt-Outs
- Filter to show opted-out contacts
- Some numbers may already be on opt-out list
- These contacts cannot receive campaigns
-
✅ Test a Small Campaign
- Before messaging entire list
- Send to yourself or small test group
- Verify message renders correctly
Advanced Import Techniques
Section titled “Advanced Import Techniques”Using Excel to Prepare Data
Section titled “Using Excel to Prepare Data”Cleaning Phone Numbers:
- Select phone number column
- Find & Replace (Ctrl+H):
- Find:
(Replace with: (nothing) - Find:
)Replace with: (nothing) - Find:
-Replace with: (nothing) - Find:
- Find:
- Format as Text (not Number) to preserve leading zeros
Removing Duplicates:
- Select all data
- Data → Remove Duplicates
- Choose “Phone Number” column
- Click OK
Adding Country Code:
- If your numbers are 10 digits, add “1” at the beginning
- Example:
4165551234becomes14165551234 - TextFlow accepts both 10-digit and 11-digit formats
Importing Tags
Section titled “Importing Tags”Include tags in your CSV to automatically organize contacts:
4165551234,Jane,Smith,jane@example.com,ABC Company,vip;toronto;customer6475551234,Bob,Johnson,bob@example.com,XYZ Corp,prospect;vancouverTag Format:
- Semicolon-separated:
tag1;tag2;tag3 - Or comma-separated:
tag1,tag2,tag3 - Tags are created automatically if they don’t exist
- Case-insensitive (toronto = Toronto)
Importing to Multiple Lists
Section titled “Importing to Multiple Lists”To add contacts to multiple lists during import:
- Import to first list
- Export those contacts
- Import same CSV to second list
- TextFlow adds existing contacts to new list (doesn’t duplicate)
Result: Contacts appear in both lists
Consent and CASL Compliance
Section titled “Consent and CASL Compliance”Import Consent Tracking
Section titled “Import Consent Tracking”When importing contacts, ensure you have:
Express Consent:
- Contact explicitly agreed to receive messages
- Document how/when consent was obtained
- Keep records for 3 years (CASL requirement)
Implied Consent:
- Existing business relationship
- Recent purchase (within 2 years)
- Inquiry within 6 months
Adding Consent Information
Section titled “Adding Consent Information”After import, add consent details:
- Select imported contacts
- Bulk Actions → Update Consent
- Choose consent type (Express/Implied)
- Enter consent date
- Note consent method (web form, in-person, etc.)
Troubleshooting Import Issues
Section titled “Troubleshooting Import Issues”Import Completed But Contacts Missing
Section titled “Import Completed But Contacts Missing”Check:
- Filter settings (may be hiding contacts)
- Opted-out status (may be on opt-out list)
- Duplicate detection (may have skipped all)
- Import summary for actual count imported
Solution:
- Clear all filters
- Check “All Contacts” view
- Review import error log
Some Contacts Imported, Others Didn’t
Section titled “Some Contacts Imported, Others Didn’t”Common Reasons:
- Invalid phone numbers (not 10-11 digits)
- Missing first name
- Duplicate phone numbers
- Invalid email format (contact skipped entirely)
Solution:
- Export contacts that failed (if error log available)
- Fix data issues in original CSV
- Re-import corrected file
Wrong Data in Wrong Fields
Section titled “Wrong Data in Wrong Fields”Problem: Names appear in email field, emails in business field, etc.
Cause: CSV columns in wrong order
Solution:
- Delete incorrectly imported contacts
- Rearrange CSV columns to match required order:
phone, firstName, lastName, email, business, tags
- Re-import corrected CSV
Tags Not Applied
Section titled “Tags Not Applied”Problem: Tags column ignored during import
Solution:
- Verify tag syntax:
tag1;tag2;tag3ortag1,tag2,tag3 - Check for typos in tag names
- Manually add tags to imported contacts after import
Next Steps
Section titled “Next Steps”After successfully importing contacts:
- Lists View - Organize imported contacts into lists
- Tags View - Add tags for detailed segmentation
- Creating Campaigns - Send your first campaign to imported contacts
Successful contact imports are the foundation of effective SMS campaigns. Take time to clean your data before importing for best results!